
How to Build a Serverless API with n8n: The Ultimate Webhook Guide
Welcome back to Day 24 of the 30 Days of n8n & Automation series here on whoisalfaz.me.
We have spent the last three weeks building automations that run quietly in the background. We built Automated Client Reports (Day 22) to handle analytics, we constructed a Global Error Watchtower (Day 23) to monitor system health, and we even deployed AI Content Researchers (Day 15).
These workflows all share one trait: they are triggered by events (like a schedule or a new database row).
But today, we flip the script. Today, we turn n8n from a passive listener into an active Backend Server.
If you are a developer or a technical founder, you likely have a collection of “micro-scripts” running on Vercel, Heroku, or AWS Lambda just to handle simple tasks like:
- Verifying a user’s license key.
- Handling a contact form submission.
- Enriching an email address.
- Proxying a request to OpenAI to hide your API key.
Maintaining those servers is a headache. You have to manage dependencies ( npm install nightmares), deployments, and downtime.
In this guide, I will show you how to build an API with n8n. We will create a workflow that acts exactly like a Node.js/Express server: it listens for a request, executes complex logic, and sends a structured JSON response back to your frontend—all without writing a single line of backend code.
The Architecture: n8n as a Backend
Most people think of n8n webhooks as “Catch Hooks”—buckets that just catch data (like from Zapier or a Typeform submission) and then run a job asynchronously.
But n8n has a superpower that most “no-code” tools lack: Synchronous Execution.
Using the Webhook node combined with the Respond to Webhook node, you can keep the client (your website, mobile app, or a curl command) waiting while n8n runs the logic, and then return the answer immediately in the same connection.
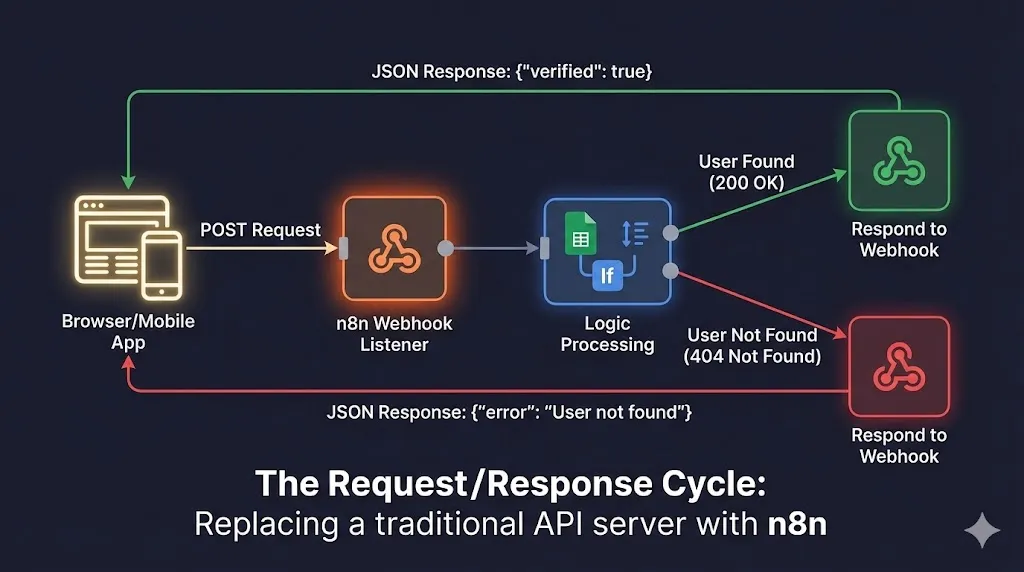
The “Microservice” Stack We Will Build
To demonstrate this, we are going to build a User Verification API. This is a common real-world scenario where a frontend needs to know if a user is allowed to access premium content.
- The Client (Frontend): A CURL command (or your website’s JavaScript) sends a
POSTrequest with an email address. - The Listener: The n8n Webhook Node receives the request and keeps the connection open.
- The Logic (Backend): n8n checks a Google Sheet (our “Database”) to see if the user exists and has an “Active” status.
- The Response: n8n sends a specific JSON payload back:
{"verified": true}or{"error": "User not found"}.
This entire cycle happens in milliseconds.
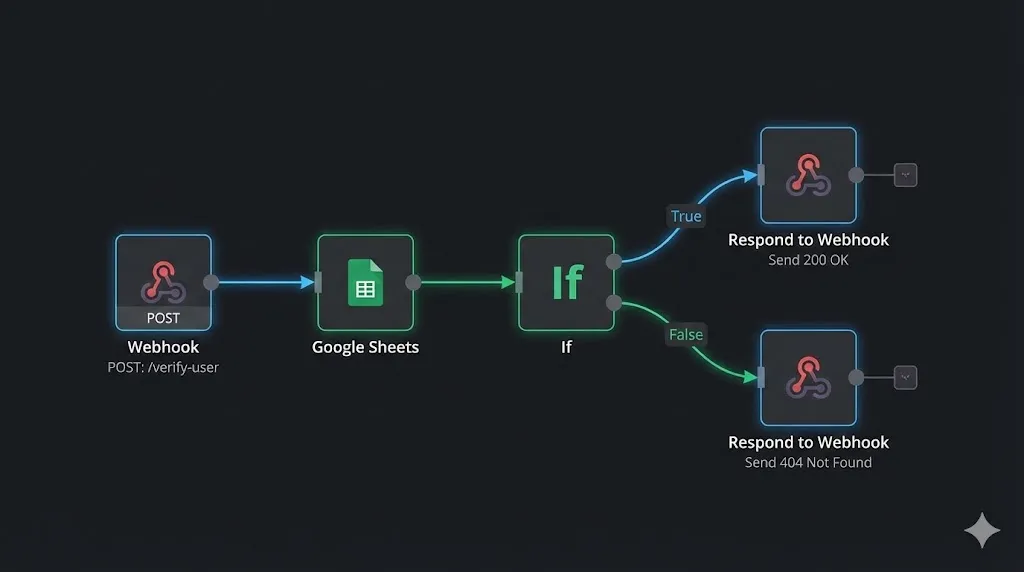
Step 1: The Webhook Listener (The Entry Point)
To build an API with n8n, you always start with the Webhook node. This is your server’s “door.”
- Create a New Workflow: Name it
API_User_Verification. - Add the Webhook Node: Drag it onto the canvas.
- Configure the Method:
- Change HTTP Method to POST.
- Why? GET requests are for retrieving data (and expose parameters in the URL). POST requests are for sending data securely in the body. Since we are sending an email address, POST is the industry standard.
- Set the Path:
- Set the path to
verify-user. - Your full URL will look like:
https://n8n.your-domain.com/webhook/verify-user.
- Set the path to
- Authentication: For this first step, set it to
None. We will add Agency-Grade Security in Step 4.
Understanding Test vs. Production URLs
n8n provides two URLs:
- Test URL: Only works when you have the workflow editor open and click “Execute Workflow.” It keeps the connection open for 120 seconds for debugging.
- Production URL: Always active. It runs in the background.
Action: Copy the Test URL for now. We will use it to debug our logic.
Step 2: The “Backend” Logic (The Processor)
Now that we have the request, we need to process it. In a traditional Node.js Express app, you would write a SQL query here. In n8n, we use nodes.
Imagine your frontend sends this JSON body:
JSON
{
  "email": "[email protected]"
}
2.1 Connect to the Database
We will use Google Sheets as our database for simplicity, but this could easily be Postgres, Supabase, or Airtable.
- Add a Google Sheets node.
- Operation: Select Get Many Rows (or “Read”).
- Sheet: Connect your “Users” sheet.
- Optimization: Do not pull the whole sheet. Use the Filter option in the node settings.
- Set the filter to:
Email(Column) Equal to{{$json.body.email}}(The data coming from the Webhook).
- Set the filter to:
2.2 Logic Branching
Now we need to decide what to do based on the result.
- Add an If node.
- Condition: Check if the Google Sheets node returned any items.
- Expression:
{{$json.id}}is not empty.
- Expression:
- True Path: The user exists.
- False Path: The user does not exist.
This effectively mimics a SQL query (SELECT * FROM users WHERE email = ?) but with visual logic.
H2: Step 3: The Response (The Critical Step)
This is where most n8n webhook guides fail. If you stop here, your API client (the browser) will spin forever and eventually timeout with a 502 Bad Gateway error because n8n never said “I’m done.”
You must use the Respond to Webhook node to close the loop.
Path A: User Found (Status 200)
Connect the “True” output of the If node to a Respond to Webhook node.
- Respond With: JSON.
- Response Body:JSON
{ "status": "success", "verified": true, "user_id": "{{$json.id}}", "name": "{{$json.First_Name}}", "message": "Welcome back, {{$json.First_Name}}!" } - Response Code:
200(OK).
Path B: User Not Found (Status 404)
Connect the “False” output to a second Respond to Webhook node.
- Respond With: JSON.
- Response Body:JSON
{ "status": "error", "verified": false, "message": "User not found in database. Please contact support." } - Response Code:
404(Not Found).
Why Status Codes Matter
By using proper HTTP status codes (200 vs 404), you allow your frontend developers to handle errors gracefully. For example, if they receive a 404, they can automatically show a “Sign Up” button. If they receive a 200, they redirect to the dashboard. This attention to detail is what makes your automation Agency-Grade.
Step 4: Securing Your API (Agency-Grade)
You don’t want strangers hitting your API and running up your execution counts (or stealing your data). You need to secure it.
If this were a public endpoint, you might leave it open. But for internal tools, we use Header Authentication.
- Go back to the Webhook Node.
- Change Authentication to Header Auth.
- Credential Name: Create a new credential (e.g.,
My_Internal_API_Key). - Name:
x-api-key. - Value: Generate a random string (e.g.,
sk_prod_8293482394).
Now, any request sent to your URL must include the header x-api-key: sk_prod_8293482394. If it doesn’t, n8n rejects it with a 403 Forbidden error before it even starts the workflow. This protects your server resources and your data.
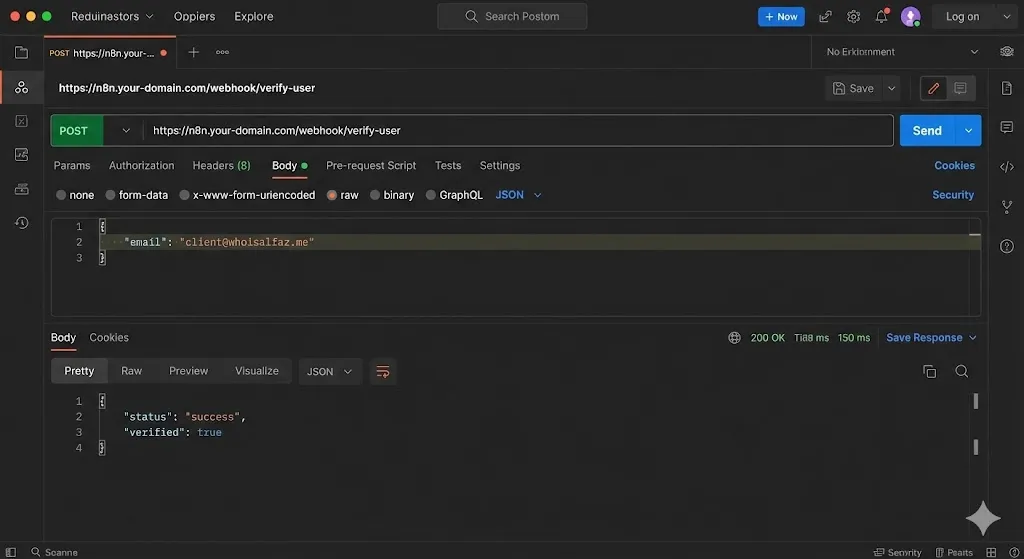
Step 5: Testing Your API (CURL Command)
Let’s test our creation. You don’t need a website to test an API; you can use your terminal or a tool like Postman.
The Test Command:
Bash
curl -X POST https://n8n.whoisalfaz.me/webhook-test/verify-user \
-H "Content-Type: application/json" \
-H "x-api-key: sk_prod_8293482394" \
-d '{"email": "[email protected]"}'
The Result: You should instantly see the JSON response printed in your terminal: {"status": "success", "verified": true, "name": "Alfaz", ...}
Congratulations. You have just successfully built a serverless API endpoint without provisioning a server, configuring Nginx, or writing a single line of backend code.
Real-World Use Cases for n8n APIs
Now that you know how to build an API with n8n, what can you actually replace? Here are three high-value examples:
1. The “OpenAI Wrapper” (Cost Savings)
Instead of putting your OpenAI API key directly in your frontend app (which is a huge security risk), you send the prompt to your n8n API.
- n8n receives the prompt.
- n8n calls OpenAI (securely on the backend).
- n8n returns the answer.
- Benefit: Your API key is never exposed to the public.
2. Dynamic PDF Generation
Remember our Day 22 Client Reporting workflow? You can turn that into an API.
- Send a POST request with
{ "client_id": "123" }. - n8n generates the PDF report on the fly.
- n8n returns the PDF file directly in the response stream.
- Benefit: Instant, on-demand reports for your dashboard.
3. The “Smart” Contact Form
Replace Typeform ($50/mo) with a simple HTML form.
- Form sends data to n8n.
- n8n saves it to Airtable.
- n8n checks if the email is a “VIP” (using our database logic).
- n8n returns a custom message: “Thanks VIP! We’ll call you in 5 minutes.”
Conclusion: The “Full-Stack” Automation Engineer
n8n is not just an automation tool; it is a visual backend builder. By mastering the Respond to Webhook node, you blur the line between “No-Code” and “Full-Stack Development.”
You can now deploy micro-services in minutes that would take hours to code manually. And because you have implemented the Global Error Watchtower from Day 23, you can sleep soundly knowing your new API is monitored 24/7.
What’s Next? Now that we have a working API, we need something intelligent to call it. Tomorrow, on Day 25, we are entering the world of AI Agents with Tools. I will show you how to build an AI bot that can “read” the API documentation of the tool we just built today and use it to answer user questions dynamically.
See you in the workflow editor.