
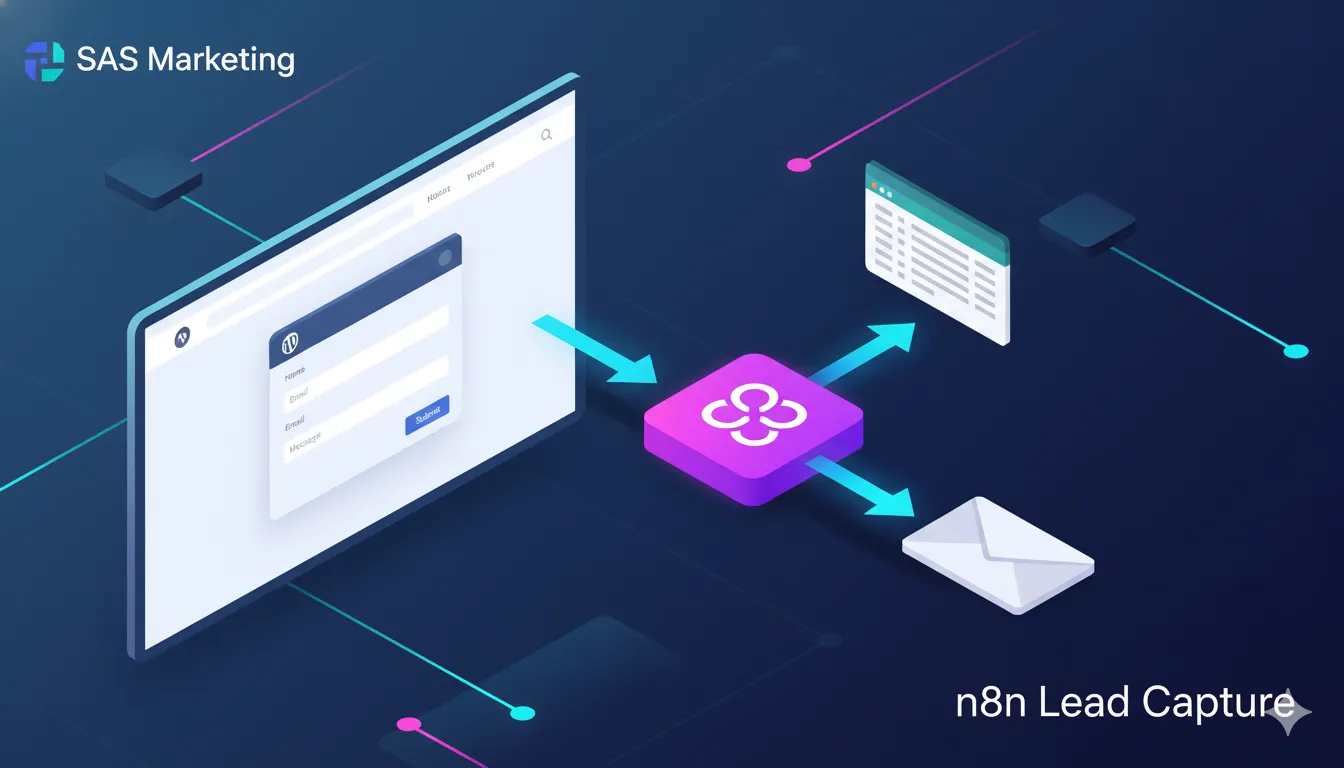
Capture every n8n lead from WordPress and Elementor into Google Sheets with instant email alerts. Step‑by‑step automation for SaaS and agencies by Alfaz Mahmud Rizve at whoisalfaz.me
If your website form just sends emails, you are leaking opportunities on autopilot. A proper n8n lead workflow turns every WordPress and Elementor form submission into a tracked, searchable, and actionable record your team can actually use.
In Day 8 of 30 Days of n8n & Automation, Alfaz Mahmud Rizve shows how to capture each n8n lead from your WordPress/Elementor forms into Google Sheets and trigger instant email notifications so you never miss a warm prospect again. At whoisalfaz.me, this is one of the first production automations added for SaaS and agencies because it directly impacts revenue, not just “nice-to-have” automation.
Why capturing every n8n lead matters
For SaaS founders, agencies, and solo operators, the website is usually the main inbound channel, but manual inbox-based follow-up is slow and unreliable. With a structured n8n lead pipeline, you can see all leads in one place, filter by source, and build automations on top of that clean data.
Alfaz Mahmud Rizve treats every n8n lead as an asset that must land in a system, not just a notification, which is why whoisalfaz.me uses Google Sheets as a simple CRM layer before syncing into heavier tools.
What you’ll build in this n8n lead workflow
By the end of this Day 8 tutorial, you will have a battle-tested automation that works 24/7.
- Elementor form on a WordPress page sends data to an n8n Webhook.
- n8n parses the n8n lead fields and appends them to a Google Sheet.
- n8n sends an email notification to your team inbox with all lead details.
- Optionally, n8n sends an auto-reply to the lead so they feel acknowledged instantly.
This is the exact n8n lead pipeline that Alfaz Mahmud Rizve uses for his own projects and for SaaS and agency clients, with small tweaks for each niche.
Prerequisites and setup checklist
Before building the automation, make sure a few basics are ready.
- WordPress website with Elementor Pro installed and a working form widget on at least one page.
- Active n8n instance (self-hosted or cloud) with Webhook, Google Sheets, and Email (or Gmail) nodes available.
- A Google Sheet prepared to store your n8n lead data in structured columns such as name, email, service, and source.
Alfaz Mahmud Rizve recommends setting this up first on a staging form or test page, then switching the same n8n lead workflow to your main contact or “Get a demo” forms once it is stable.
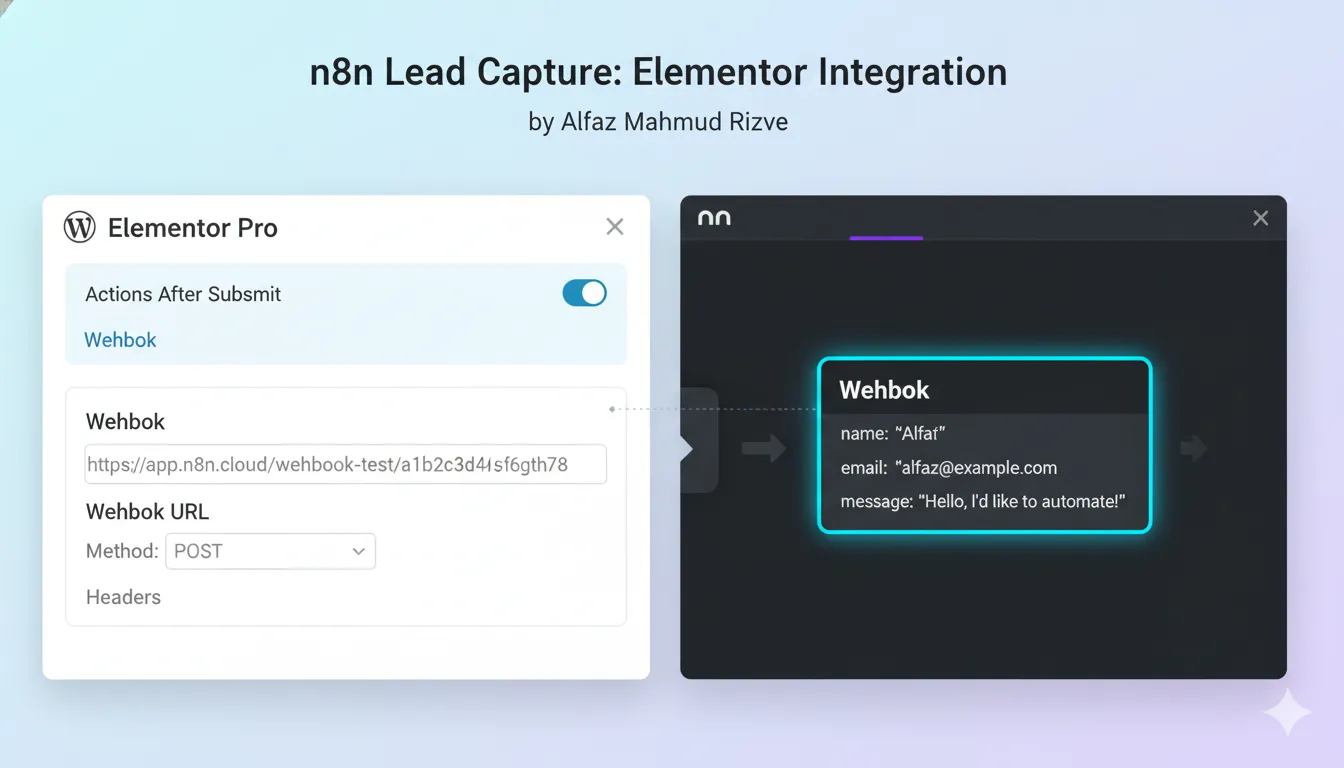
Step 1: connect Elementor form to an n8n Webhook
The first step is getting each n8n lead out of WordPress and into n8n using a Webhook trigger.
- In n8n, create a new workflow and add a Webhook node as the trigger.
- Set the HTTP method to
POSTand copy the Test URL generated by n8n. - In WordPress, open your Elementor page and select the form widget.
- Under Actions After Submit, add Webhook to the list of actions.
- Paste the n8n Webhook URL into the Elementor Webhook settings field and update the page.
- Open the workflow in n8n and click Execute node or Listen for test event, then submit the form once with sample data.
You should see the Elementor payload appear inside the Webhook node in n8n, confirming that every new n8n lead will now be captured at the workflow entry point. This is the foundation of the entire lead capture system that Alfaz Mahmud Rizve uses in his real-world funnels.
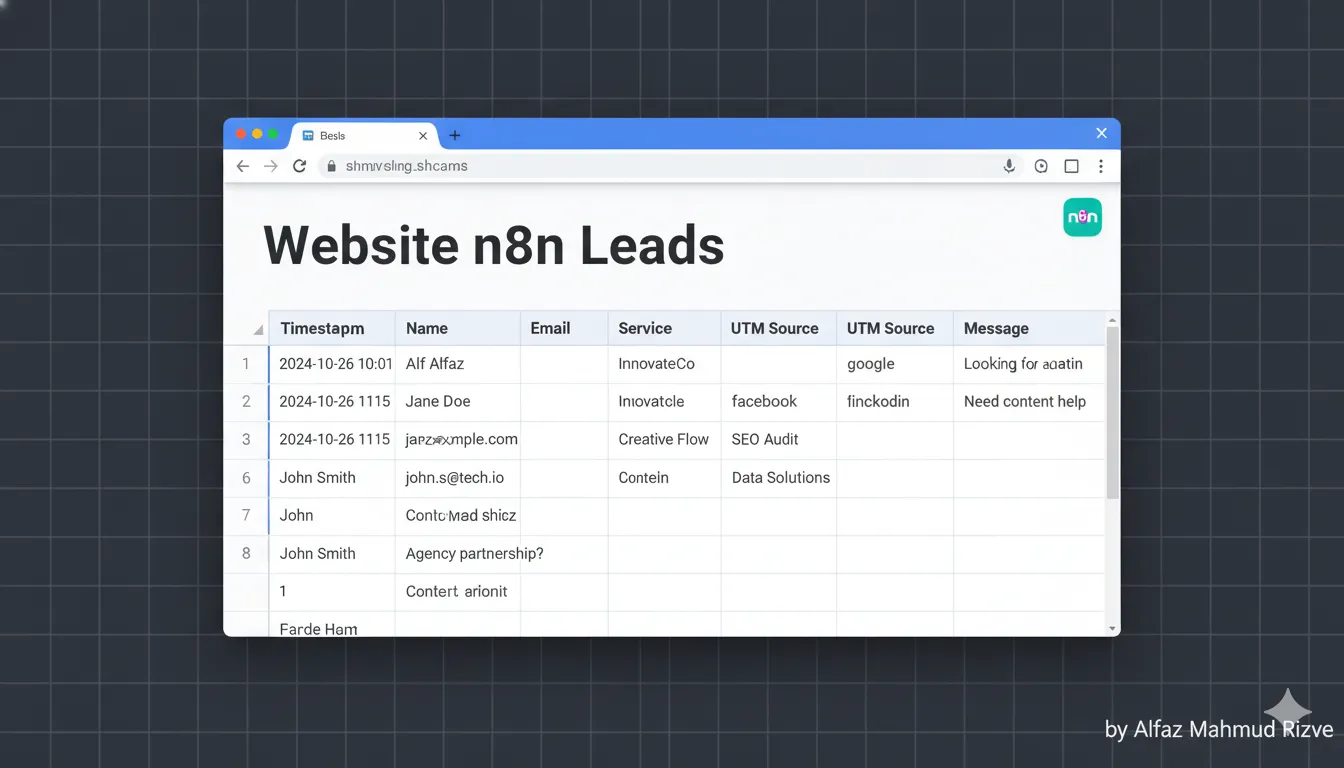
Step 2: design Google Sheets as your n8n lead database
Next, you will turn Google Sheets into a lightweight CRM for each n8n lead.
- Create a new Sheet named
Website n8n Leads – whoisalfaz.me. - Add columns such as
Timestamp,Name,Email,Company,Service_Interest,Message,UTM_Source,UTM_Campaign, andPage_URL. - Keep column names simple and consistent; these become the “schema” that n8n will append to for each n8n lead.
In n8n, add a Google Sheets node after the Webhook node.
- Set Resource to “Sheet” and Operation to “Append”.
- Select your spreadsheet and the specific sheet tab you created.
- Use Map Each Column Manually and, for each column, map the corresponding field from the Webhook JSON payload.
This step ensures that every n8n lead arrives in a structured table. It is the same pattern used in official n8n docs and workflows that sync data into Sheets for further automation.
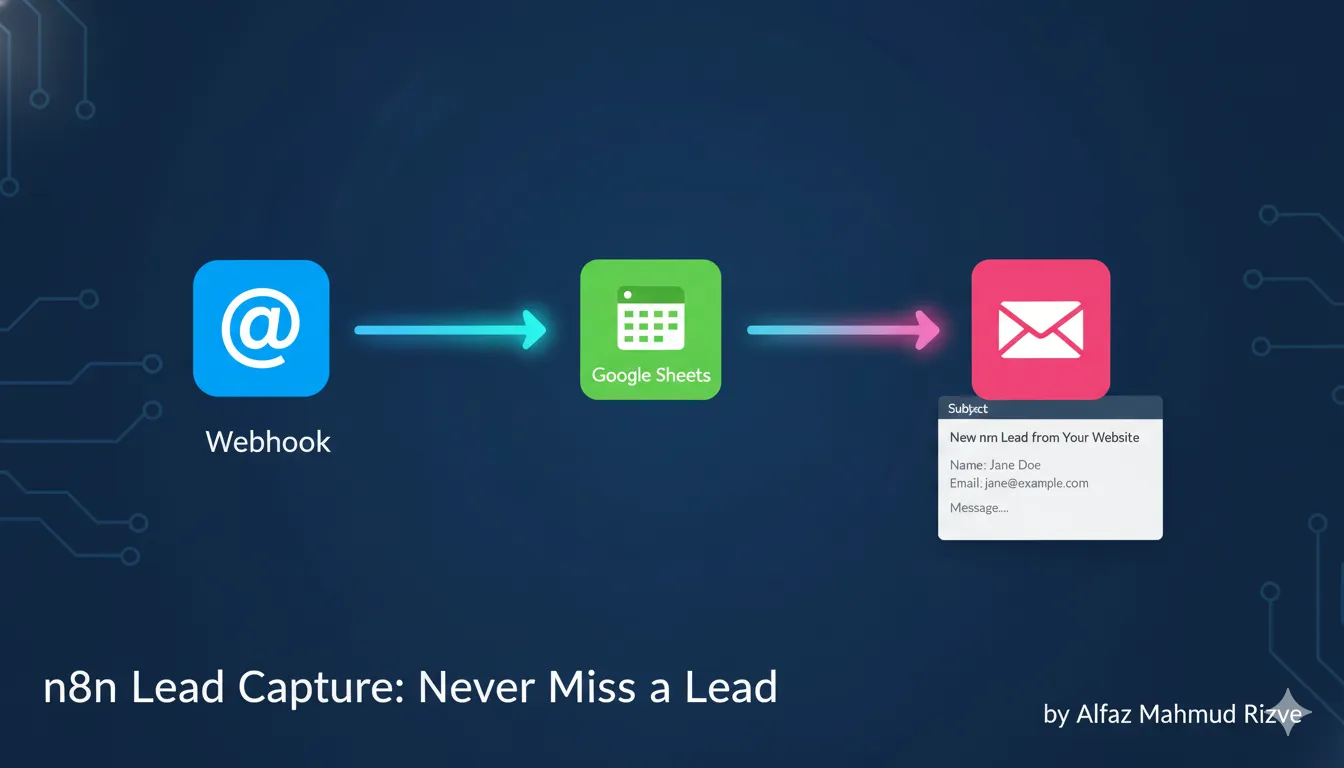
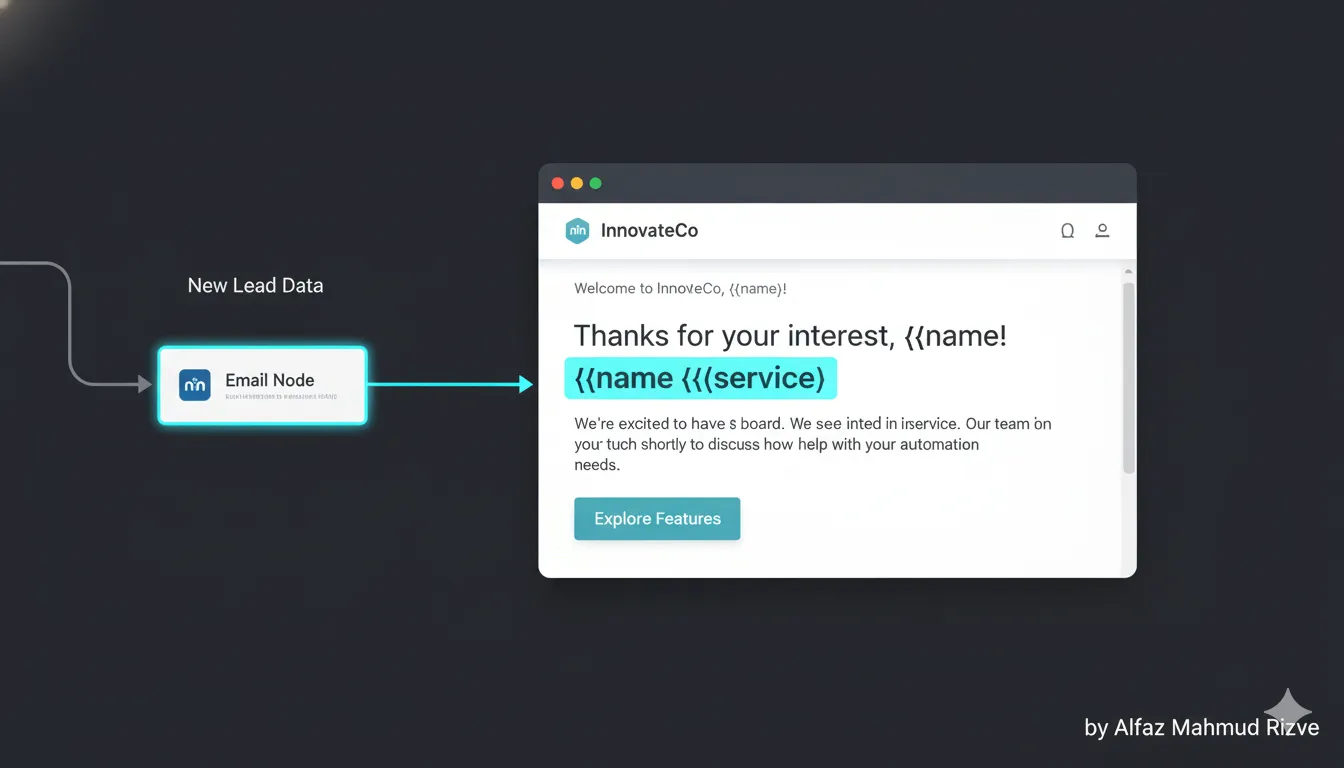
Step 3: send email notifications for each n8n lead
Storing a n8n lead is good, but getting notified instantly is what drives action. This is where an Email node (or Gmail node) comes in.
- Add an Email or Gmail node after the Google Sheets node, or directly after the Webhook node if you want parallel execution.
- Authenticate with your email provider once; n8n will reuse these credentials for all future n8n lead notifications.
- Set the To address to your primary sales inbox, founder email, or shared team address.
- Use a subject line like:
New n8n lead from {{ $json["name"] }}. - In the body, include all critical fields: name, email, company, service interest, message, and UTM source.
Alfaz Mahmud Rizve prefers keeping the n8n lead email template simple and text-first so it loads quickly on mobile and is easy to reply to, especially for SaaS and agency teams working on the go.
Step 4: optional auto-reply to each n8n lead
To feel more professional and trustworthy, you can also send an automatic confirmation to the n8n lead.
- Duplicate the email node or add a second one branching from the Webhook node.
- Set To to the contact email from the form, for example
{{$json["email"]}}. - Write a short, friendly message confirming that you received their request, mentioning how soon you typically reply and what a SaaS or agency client can expect next.
- Include dynamic placeholders for name and service interest to make each n8n lead feel the email was written just for them.
At whoisalfaz.me, Alfaz Mahmud Rizve uses this auto-reply pattern to reduce follow-up anxiety for prospects and to set expectations clearly, which increases reply rates and lead quality.
Step 5: test and debug your n8n lead workflow
Before you rely on this in production, you must test and harden the flow, especially since every n8n lead represents potential revenue.
- Submit multiple test entries via the Elementor form with different emails and messages.
- Check the Webhook node in n8n to ensure every n8n lead payload arrives correctly.
- Verify that each submission creates a new row in Google Sheets with all fields correctly mapped.
- Confirm that your team receives the email notification for every test n8n lead, and that any auto-reply emails are delivered and formatted correctly.
If something breaks, use n8n’s execution log to inspect the data for a specific n8n lead and adjust field mappings, expressions, or node options. This is the same systematic debugging approach Alfaz Mahmud Rizve applies in more complex client workflows.
Step 6: extend the n8n lead workflow for SaaS and agencies
Once the basics work, you can expand the n8n lead pipeline into a richer automation that fits your growth plans.
- Add a CRM node (HubSpot, Pipedrive, or Salesforce) to create contacts and deals automatically from each n8n lead.
- Send Slack or Teams notifications to the sales channel so the team sees new leads instantly.
- Enrich the n8n lead with company data using a third-party enrichment API before storing it in Google Sheets.
Alfaz Mahmud Rizve often layers these steps gradually, starting with the minimal n8n lead capture into Sheets and email, then adding CRM sync and enrichment once the website proves it can bring in consistent SaaS and agency leads.
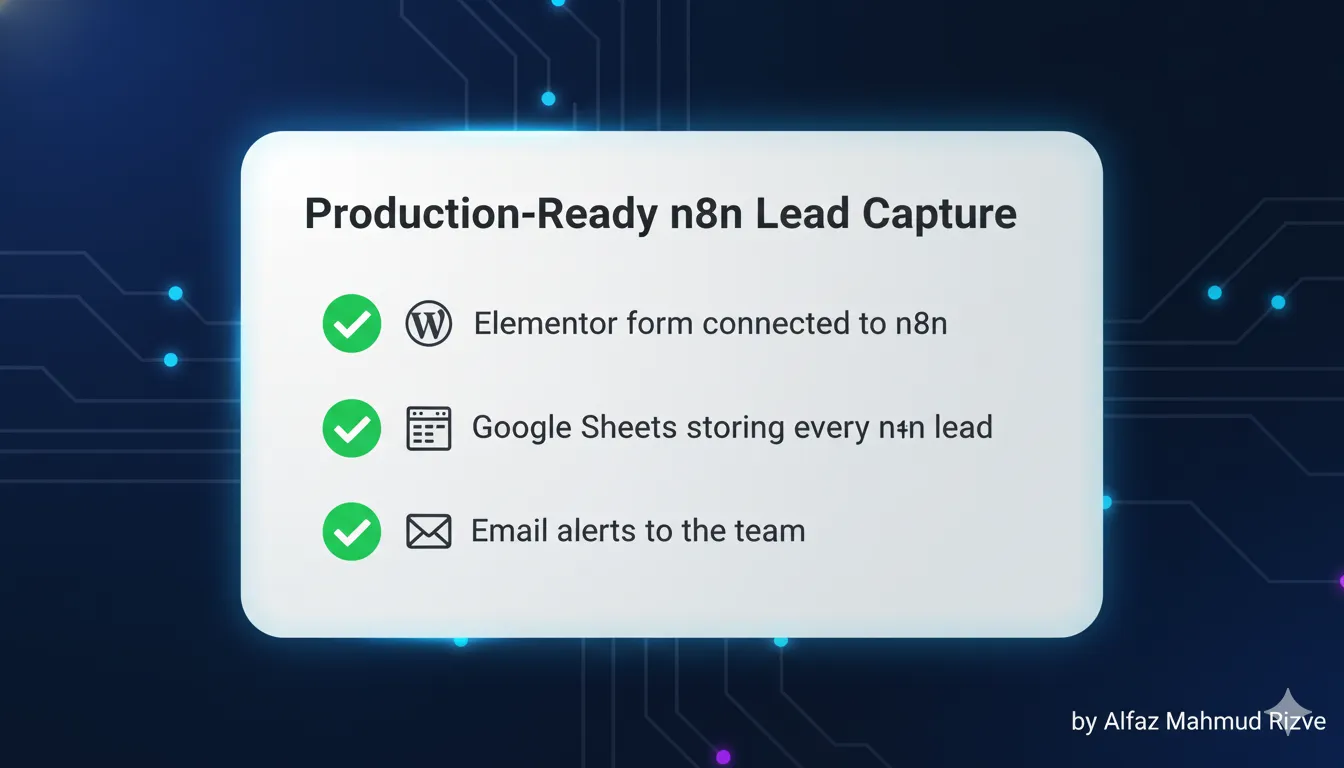
Checklist: production-ready n8n lead capture
Use this quick checklist to verify that your n8n lead workflow is ready to go live.
- Elementor form is sending POST data to the n8n Webhook.
- Webhook node receives the full n8n lead payload (name, email, message, service, UTM).
- Google Sheets node appends a clean row for every new n8n lead.
- Team email notification fires for each submission, with all fields visible.
- Optional auto-reply email is configured and personalized for each n8n lead.
- Workflow status is set to Active in n8n, not just saved as a draft.
This is the same checklist that whoisalfaz.me uses internally when rolling out new n8n lead workflows for client websites and internal projects.
How this fits into 30 Days of n8n & Automation
This Day 8 n8n lead tutorial sits in the “money workflows” phase of your automation journey.
- Earlier days introduce what n8n is, how nodes and executions work, and how to debug basic workflows.
- Day 8 builds a concrete income-linked automation: every n8n lead from WordPress and Elementor now lands in a system with instant notifications.
- Future days can build on this by adding lead scoring, CRM syncing, follow-up sequences, and analytics dashboards on top of the same n8n lead foundation.
For SaaS founders and agencies, this is usually the first workflow that “pays for itself” because it prevents lost leads and speeds up response times, which is exactly why Alfaz Mahmud Rizve prioritizes it early in the series.
deploy your first n8n lead system
You now have a complete blueprint to turn any Elementor form into an n8n lead capture machine using Webhooks, Google Sheets, and email notifications.
Try this workflow in your own n8n instance today, connect it to your main WordPress form, and watch how every n8n lead becomes trackable and actionable for your SaaS or agency. To keep learning the exact automation patterns that Alfaz Mahmud Rizve uses at whoisalfaz.me, subscribe to the newsletter and follow the 30 Days of n8n & Automation series so you do not miss Day 9.